Slackware-Linux Installation A

OK... Now it's time to put that first Slackware 10.1 CDrom into the CD drive and power up the computer--- cross your fingers as you do this.The Slackware ISO CD#1 is a bootable Linux CD and if your CD player knows how to deal with bootable CD's (and the BIOS of your machine is set to boot from CD-- check that if there's trouble) you should see lots of action on the screen when the machine boots up.When this 'action' stops, you will see at the bottom left of the screen the prompt 'boot:'
 When you get the 'boot:' prompt, hit the ENTER
 key. You'll see lots of text fly by on the screen-- read every word if you can, but don't feel bad if you can't remember much of it.Hit ENTER again when you get asked to select a keyboard map.
You will be shown an 'IMPORTANT' message... as it will warn you of some of what will be going on shortly.When it tells you to login as root with the 'Slakware Login' prompt, type 'root' and then hit ENTER.
If it says 'Linux 2.4.29...' then you're logged in.
 At this point, you need to setup the Linux partitions on the hard drive.
 Type 'cfdisk' to start the Linux version of Fdisk.
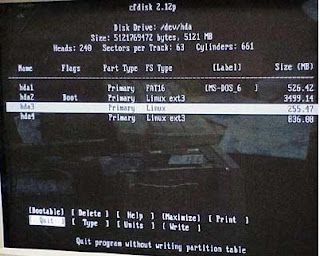
You will see at the top of the screen your present DOS 'FAT16' (or FAT32) partition-- you want to keep the DOS-FAT partition!
While it is highlighted, you want to use the right and left arrows to highlight 'bootable' on the bottom of the screen and hit ENTER to toggle the 'bootable' flag to OFF (no bootable showing) for that DOS
partition.
Please remember that the linux root partition (usually 'hda2') will need at least 500meg for a pared-down bare bones Slackware Linux.
Add to this that you'll want to add a 100meg or more swap partition and a 100meg or more /jnos partition.
Now you want to use the down arrow to 'free space' and then use the right arrow to select 'NEW'. Hit Enter.
We are now configuring what Linux calls /dev/hda2 -- this will be the partition that the main Linux operating system will reside on. It's also known as the 'root partition'. When it asks you how large to make this partition, you want to make it fairly large-- so you can load lots of Linux programs and features. On my 5meg drive, I chose 3.5meg for this partition.
I would recommend you choose at least that size too, as it is assumed your /dev/hda2 (or '/' or 'root') partition is at least 3.5meg in these instructions-- you'll see why later on.
Before we leave the /dev/hda2 partition, you will want to use the right/left arrows to highlight 'bootable' and then hit ENTER to make that partition bootable.
 Next we hit the down arrow again and highlight 'free space' and then right arrow over to NEW. We will now create the 'SWAP' partition. This is where the Linux version of the Windows 'swap file' goes.
In my case, I selected a swap partition of 255meg. While our new /dev/hda3 'swap' partition is highlighted, we want to use the right arrow and move it over to TYPE and hit ENTER. Now we see a screen which lists all the different types of partitions you can make with this great linux cfdisk tool. As you can see, you have quite a selection.

Hit the spacebar to get to the second page.
Notice that under the list it says 'TYPE: 82'. This is what we want. Type 82 is a Linux swapfile type. If it doesn't say 82, make it say 82. Hit ENTER once the TYPE is 82.

Finally, we hit the down arrow again into free space and then right arrow over to NEW and create our final jnos partition.
Use up all the remaining space of the hard drive with this new /dev/hda4 partition. As long as you have 100meg or more your Jnos will be happy.
I suggest putting Jnos on it's own partition as this will allow you to have fun upgrading Linux later on and not have to worry too much about erasing your Jnos files. It's very handy to keep it separate.
When you have no free space left on the drive, you MUST right arrow over to the WRITE command in order to write the new partition table to the hard drive. Follow the prompts and type in 'yes' when it asks you to.
 Before you quit out of CFDISK, make sure you have written down what the names of the various partitions are and what they will be used for. hda1=dos, hda2=linux root, hda3=swap, hda4=jnos. Failure to write this down will cause you considerable misery very soon.
 When it's done writing to the partition table, use the right or left arrows to highlight QUIT and then hit ENTER to get back to the Linux setup screen.
0 comments:
Post a Comment