Make Money Online In Pakistan Join Now

Check Page Rank of any web site pages instantly:
This free page rank checking tool is powered by Page Rank Checker service

Followers

YouTube Downloader Free Download


Software Description

Software that allows you to download videos from YouTube, Google Video, Yahoo Video, and many others and convert them to other video formats.

The program is easy to use, just specify the URL for the video you want to download and click the Ok button!It also allows you to convert downloaded videos for Ipod, Iphone, PSP, Cell Phone, Windows Media, XVid and MP3.
You can use this Software to download the videos of your choice from home, at the office or in school.
Download now and get started downloading your favorite videos from YouTube

YouTube Downloader 2.5.3 Main Features :

Download videos from YouTube, Google Video, MySpaceTV and many others
Allows you to download YouTube videos for which you need to be 18+ years of age

Converts video for Ipod, Iphone, PSP, Cell Phone, Windows Media, XVid and MP3
Provides the ability to cut and select the output quality of converted videos

Uses the FFmpeg engine to convert the videos
Plays videos downloaded in Flash

Read more...

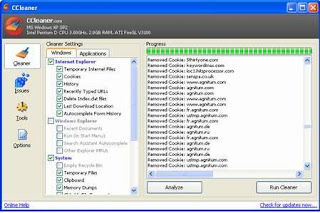
CCleaner 2.30.1130


MD5: C8AD7A2D26EBD1BDF656E6DBE605D101
Information: website
Size: 1.07 MB
MediaFire: Download
License: Freeware

CCleaner is a freeware system optimization and privacy tool. It removes unused files from your system - allowing Windows to run faster and freeing up valuable hard disk space. It also cleans traces of your online activities such as your Internet history. But the best part is that it’s fast (normally taking less that a second to run)


Read more...

FreeRAM XP Pro 1.52


Publisher's description


FreeRAM XP Pro includes automatic memory monitoring and optimization; advanced tray support; fast, threaded freeing with a stop option; multiple system-metric monitors; a simple and attractive GUI; memory reporting and diagnostic logging; and real-time memory information. FreeRAM XP Pro's AutoFree feature intelligently scales how much RAM is freed with your current system status, thus optimizing RAM without slowing down your computer. Additionally, FreeRAM XP Pro's unique Global Memory Compression technology frees memory instantly in a way that is completely unlike other memory managers. FreeRAM XP Pro has been designed to be easy to use yet highly customizable by computer novices and experts alike.

Version 1.52 enables Global Memory Compression by default for all memory freeing operations (this can be disabled through the Settings); adjusts AutoFree to be slightly more conservative when freeing RAM; and fixes a minor installation bug.

Read more...

CD-Rom Drivers Make Installing off CD’s Faster


CD Rom Drivers are another form of device drivers. This time the device is a removable hard disk called the CD. CD Rom Drivers also perform all the functions that a device driver is supposed to perform. The driver is basically the link between the camera and the picture application on your PC. When an external device such as the CD is connected to the PC it needs a bridge to be able to communicate with applications on your PC. This bridge is provided in the form of CD Rom Drivers. The CD Rom Driver basically makes the information stored in the CD compatible for use on the PC. Without the CD Rom Driver you will not be able to access the information in the CD and will also be unable to perform any kinds of tasks with or on it. Different CDs with different contents may have different drivers. So make sure you have the driver installed before fretting about why your CD is not working.


A CD Rom Driver works in the very same way that any other driver would. When you, the user commands the application to perform a task then immediately the command is transported to the CD Rom Driver which transports it to the CD Rom. The CD Rom now takes the necessary steps to produce the desired effect and sends these to the CD Rom Driver which finally send it to the application on your PC in the form of a response to the command. This string of events occurs very fast at lightning speed and you immediately get to hear what you want to. Just because the steps are too many, it does not translate into a time consuming long process. What is going on inside your PC is a complex series of events that trigger the response to your command.


A CD Rom Driver makes installing softwares and other programs from the CD a faster affair. Normally it would take you a while to install programs from a CD Rom to the computer. With the CD Rom Driver this job is done much faster and with relative ease. But the CD Rom Driver also needs regular updates. Without these regular updates the CD Rom Driver will become outdated and then all the benefits that it provides will not be applicable any more. So to prevent this and to make installing off CDs a much quicker and simpler affair, do install a CD Rom Driver on your PC.

Read more...

Camera Drivers Save Your Pictures


Camera drivers are drivers that are used to make your digital camera compatible with your PC. A camera driver performs the basic function of any device driver. Here the camera is the device. The driver is basically the link between the camera and the picture application on your PC. Without the camera driver the images that are there on your will not be visible properly or in the right orientation on your computer screen. So it is very important to have a camera driver installed on your PC before you upload the pictures taken by your camera on to your PC. The main function of the camera drive here is to make the images compatible with your PC so that they can be read and displayed there on the screen. Many of us take a driver for granted but the amount of work that it does is only evident once you remove it. Everything seems to fall out of place and everything gets disorganized.


When you, the user commands the application to perform a task then immediately the command is transported to the camera driver which transports it to the digital camera. The camera now takes the necessary steps to produce the desired effect and sends these to the camera driver which finally send it to the application on your PC in the form of a response to the command. This string of events occurs very fast at lightning speed and you immediately get to hear what you want to. Just because the steps are too many, it does not translate into a time consuming long process. What is going on inside your PC is a complex series of events that trigger the response to your command.

With the help of the camera driver you can edit your pictures and put in numerous effects and tweak your images to obtain desired results. A camera driver not only helps to transfer your images to the application on the computer but also helps in improving the performance of your camera. The driver of course, has to be updated regularly to obtain the latest technologies that the manufacturers may have come up with. With these new features and tools you can move towards achieving better quality pictures. Usually the drivers come with the camera when you buy it in the form of a CD. You can also download the drivers from the manufacturer’s site if you want to.

Read more...

Audio Drivers: Crystal Clear Sound

An audio driver is a software or a program that acts as a bridge between the sound card and the operating system on your PC. It is because of the audio driver that your sound card is able to produce the effects that it does on the computer. A driver is very essential in case of not only sound cards but all devices that are attached externally to the PC. Without an audio driver there is no way that your sound card will be compatible with the sound applications on your PC and work in a way that you want it to. It is the driver that communicates the information received from the application to the sound card and back to the application again in the form of a response.


When you, the user commands the application to perform a task then immediately the command is transported to the audio drive which transports it to the sound card. The sound card now takes the necessary steps to produce the desired effect and sends these to the audio card which finally send it to the application on your PC in the form of a response to the command. This string of events occurs very fast at lightning speed and you immediately get to hear what you want to. Just because the steps are too many, it does not translate into a time consuming long process. What is going on inside your PC is a complex series of events that trigger the response to your command.

You can either buy the audio drive separately in the form of a CD, and install it on your PC or you can download it from the site of the manufacturers of the sound card that you are using on your PC. The latter is a better option as drivers are constantly updated and downloading the updated versions from the internet is a much easier option that installing the updates from a CD every time. The CD may not be available all the time and you may not always be in a situation to buy the CD from the market every time you need an update. Usually drivers are made by the manufacturers of the device themselves. But in some cases nowadays, drivers are also made separately individuals who want to sell them. So pick your option although the drivers made by the manufacturers are much more reliable and dependable.

For more information on how to download and install audio drivers download.cnet.com

Read more...

WinRAR 3.93 Final (32/64 bit) (+Portable) MultiLang


Windows Software | WinRAR | 10.3 MB

WinRAR is Windows version of the RAR archiver - a powerful tool which allows you to create, manage and control archive files.

RAR features include:
* Highly sophisticated, original compression algorithm
* Special compression algorithms optimized for text, audio,
graphics data, 32 and 64-bit Intel executables
* Better compression than similar tools, using 'solid' archiving
* Authenticity verification (registered version only)
* Self-extracting archives and volumes (SFX)
* Ability to recover physically damaged archives
* Locking, password, file order list, file security & more ...

Title: WinRAR
Version: 3.93 Final (32/64 bit) (+Portable)
Developer: RarLab
Homepage: rarlab.com
Updated: 2010.03
License / Price: 34,22$(patch)
Language: Multilanguage
Platform: Windows 98/2K/XP/2K3/Vista/7
Size: 10.3 mb

Read more...

WinZip 14.5 build 9095


Publisher's description


WinZip is the world's most popular Zip utility for file compression, file encryption, file sharing, and data backup. Now supporting Windows 7 and featuring an Office 2010-style ribbon interface, WinZip 14.5 works the way you think, zipping and unzipping files effortlessly for fast, efficient, and secure uploading and downloading, email transmission, and data archival. Simply select files to compress then just click 'Zip'. And check 'Encrypt' for added security. Or use '1-click Unzip' to open almost any compressed file instantly. Bundle files and photos into zipped packages and share them using 'Attach to E-mail'. And backup your desktop, documents, email, pictures, etc. with just a click on the 'Backup' tab. WinZip creates Zip, LHA and new Zipx files--our smallest Zip files ever. Let WinZip select the best compression method for maximum efficiency. It even compresses digital photos and graphic images by 20 - 25% with no loss of quality. Also create self-extracting Zip files, ideal for distribution to recipients who may not own WinZip. WinZip opens and extracts content from the widest range of archive formats, including Zip, Zipx, RAR, 7Z, BZ2, LHA, CAB, IMG, ISO, and most other compressed file types. Use WinZip to secure confidential files using strong, password-based encryption. It supports FIPS-197 certified 128- and 256-bit AES encryption. Package and share files with WinZip, creating logical groups of related files and emailing them instantly. Zipped packages are perfect for organizing and securing email attachments, which also send faster thanks to smaller file sizes. Prevent data loss with WinZip's automated data backup facility. Backup selected data files and schedule those backups to run automatically and unattended. Burn your backup data to CD/DVD or network drive, or upload your backups to an off-site server using the built-in FTP client. Even automate routine zipping tasks. Save space and time, and keep your digital world safe...

What's new in this version:

WinZip 14.5 delivers an entirely new, Office 2010-style, user interface and unveils numerous key features that dramatically simplify the product.

Read more...

NXPowerLite Desktop Edition 4.1.4

Publisher's description

NXPowerLite Desktop Edition radically reduces the size of Microsoft Office files: PowerPoint presentations, Word documents, Excel spreadsheets, and JPEG images, making them easier to use, store and share. Files remain in their original format, with no discernible loss of quality and there's no need to unzip before using them. It's incredibly easy to use. Simply select a file, choose your optimization level and click the 'Optimize' button. If you use Lotus Notes, Microsoft Outlook, Outlook Express or Windows Mail, it's even easier. NXPowerLite Desktop Edition will automatically optimize e-mail attachments as they are sent. File recipients don't need NXPowerLite to open or edit the attachments.

What's new in this version:

Version 4.1.4 may include unspecified updates, enhancements, or bug fixes.

Read more...

Avast Internet Security 5.0.507

Publisher's description

Avast Internet Security includes antivirus engine, anti-rootkit protection, anti-spyware protection, script shield, process virtualization, command line scanner, anti-spam filter, and built-in firewall. Avast Internet security includes all the features of the free Avast anti virus and Firewall, and antispam. Once installed, avast runs silently in the background to protect your computer against all known forms of malware with a real time virus protection. Avast Internet Security also fully integrated antispam filter to detect unwanted e-mail. Avast Internet Security provides complete computer security. It is designed for people that shop and bank via the internet or store sensitive data on their computers.

What's new in this version:

Version 5.0.507 may include unspecified updates, enhancements, or bug fixes.

Read more...

Norton Internet Security 2010

Publisher's description
Norton Internet Security 2010 delivers fast and light comprehensive online threat protection. It guards your PC, network, online activities and your identity with innovative, intelligent detection technologies optimized to combat today's aggressive, rapid-fire attacks.

Improved Norton Safe Web technology blocks Internet threats before they can infect your PC. So you can browse, buy and bank online with confidence. It even warns you of unsafe web sites right in your search results. Plus, unlike other Internet security suites, it provides easy-to-understand threat and performance information to help you avoid future threats and keep your PC running fast.

CNET Editor's Note: The Download Now link will direct you to the developer's site where you'll be asked to provide your e-mail address to download a file.

Read more...

Computer Gaming Hardware

A decade or two ago no one could have imagined that technology will have advanced this far. Or that PC games will have advanced so mush as to strain even the newest video cards and processors available on the market. Any decent gamer knows that the requirements needed for pc games keep getting higher putting to the test both the gamers PC as well as his budget as he tries to improve his existing computer or replace it with a newer and better qualified one that can keep up with the latest and the future games as much as possible.

Having a PC computer capable of keeping up with the high requirements of PC games begins with having your graphics card driver updated to the latest version available. This can be done by visiting the manufacturer's website. Failing to do so can put a serious dent in the performance of your computer when running a game.


When thinking about a computer suited for gaming 3 things pop into mind: processor, RAM and graphics card. These represent the core of any gaming computer.

1. Processors are the "heart" of any computer so you have to make sure that it is strong enough to bear the strain of the games you are going to run on your computer. When it comes to processors one can only think of dual core or quad core processors from one of the two leading companies Intel and AMD equipped with high cloaking.


2.If the processor is the heart for a gaming computer than the graphics card is the "soul" since unless you have a top of the line graphics card your gaming experiences will be more gaming nightmares. For a graphics card you can only look at the leading companies of Nvidia and ATI that have proven more than capable to provide a great experience when playing games.

3. It's best to have your RAM to at least 2 Gb, otherwise your game might seem a bit sluggish. If you are planning to use Windows Vista or Windows 7 you might want to think of at least 3 Gb.

After getting the core elements of a good gaming experience it's time to buy the rest of the hardware and peripheral components:
4. Time to buy a good ventilated case to house all these computer gaming hardware components since they are quite expensive and they need to be well protected. Together with the case you also need to buy a high wattage power source strong enough to provide juice for your hardware components as well as fans so that the motherboard, video cards and hard disk units are kept as cool as possible.

5. For hard disks drives you have to consider just how much you plan to install on your computer since most games require a certain amount of disk space to be free even after installing them.

6. In order to hear the sound in your games you will also need a good surround sound card with a 5.1 or 7.1 speaker system. And if you want to be selfish and keep the gaming experience a personal one (meaning you don't want to disturb your neighbors or family members) consider buying a pair a good pair of headphones or even the 5.1 surround headphones.

7. You can't have a computer without a monitor capable of showing those fine details that your video card is capable of so you will definitely need a wide screen LCD monitor to watch your games close up and personal.

8. Time to get that special keyboard as well as mouse specially created for dedicated gamers that have all those extra keys to help you have a better control of that car in a turn or that character when he ducks behind cover.

9. For those who prefer a more console like approach to games a steering wheel and joysticks

10. If you are planning to play games online with other people you will also require a network card capable of sending and receiving data at very high speeds.

11. Don't forget about that microphone to better communicate with your team members as well as a web cam to have a more visual communication with your gaming partner.

With so many computer gaming hardware components it may prove too much for those gamers that perhaps are not so interested in building their own personal gaming computer to decide what exactly to choose. To help them companies have come up with a way to have them make fewer choices. They put on the market gaming computers which unlike general purpose computers have been specifically designed to handle pc games. Gaming Computers have appeared based on this very idea: to provide the best experience for gamers worldwide. These Desktop Computers have been build with the very idea to be able to play the newest and the most system resources demanding games available on the market.

Read more...

Video Game Design


Many users have become interested in the last few years in finding our more about ways in which they could improve their work with computers by improving their knowledge and skills. There are many aspects which can be learned about computing technology and everyday new things appear so that we always have something new to learn in this respect.
There are many new things which can be nowadays done by using a computer and which in the past were not even considered as possible to be made in this way. There have been made many changes in technology and computers are much more improved than they used to be. This is very important and very good because computers are used nowadays in many domains in which they are very useful in helping all sorts of improvements to be made. They need to always be improved so as their results might help users become more effective and productive in their work with computers.


Among the many aspects which have interested more users in the last few years, ways in which video games are designed and the hardware requirements from this point of view are important to be analyzed as well. This is because we are all interested in giving great gaming experiences with our computers and we should also try and learn some things about hardware requirements for video games design as well so as for us to understand certain aspects better. These aspects might even help us improve our knowledge and skill in using computers for all sorts of activities including gaming as well.

In a discussion on hardware requirements for video game design it should be mentioned the fact that hardware is important in this respect as it represents the components which have to support specific tasks related to video game design and this is why there are certain requirements which need to be taken in account. Such hardware components involved in this type of design can be considered for example the graphic tablets and the scanners which will certainly be needed for the pictures of drawn type of artwork which need to be taken. These aspects have to be considered also in relation with all sorts of costs which will be necessary to be made in such cases.

It might also be useful to be mentioned when discussing about hardware requirements for video game design the fact that these tools having been previously mentioned are not the only ones included within such requirements.
In this respect, it should also be considered the necessity of running the final project which will also include certain hardware requirements so as to be established. Certainly, these are only some of the important aspects which can be mentioned when analyzing hardware requirements for video game design as there are many others which might interest users as well. It is easy nowadays to get informed about all sorts of aspects related to computers such as this one and users interested in learning more should be willing to spend some time and search for the

Read more...

Laptop Computer System

Read more...

Parts Of A Computer Hardware


Nowadays, there are many types of data available for us in order to become well informed about computers and computer hardware components. It is important to learn about what kind of computer hardware components we can find within our PCs and which are their functions within the computer system. This is because there are many parts of computer hardware within any type of computer and they are very important to be analyzed in order to learn important information about our computers so that we might work easier and more properly with them. It is also important to become aware of these important functions within the computer system in order to be able to overcome certain problems that we might encounter while working with our computers. In this way, the users can easily learn how to solve their computer problems by following certain troubleshooting steps and avoid losing time by getting to a specialist in order to help them solve these problems.
Among the most important parts of computer hardware that users should be familiar with are the motherboard, the central processing unit, the keyboard, the monitor, the chips, the printers, the random access memory, the input devices, the networking cards and others. They are all very important in determining whether the computer is functioning properly or not because they are connected with each other in one way or another and they determine the way in which the computer operates. The motherboard is considered to be a very important part of computer hardware because it ties components together within the PC. The motherboard is also very important because it allows all the parts of the computer hardware to be powered on, which enables the computer to function. Another important aspect to be mentioned about the computer motherboards is the fact that they have passed through many changes in the last few years, because the computer technology has evolved offering the specialists the possibility to improve these parts of computer hardware as well. The main difference between the first models of motherboards and the modern ones is the fact that the old ones supported very few computer components in comparison to the number of components that we can nowadays find on our motherboards within the computers.


The motherboard is an essential part of computer hardware which actually enables the computer to function. It has been considered that without the other components that can be found on the computer motherboard this components would actually be somehow useless but taking in account that it supports and powers up the most important computer hardware components it is important to be mentioned the fact that without it the computer would not be able to function in any way. The computer motherboard contains the microprocessor chip to which all of the other important parts of computer hardware are being connected. The form factor term is also an important aspect related to the motherboard. It represents the layout of this important part of computer hardware. The form factor is considered to be very important because according to it the other hardware components are being placed within the computer on the motherboard. The form factor is not the only important one related to the motherboard. Also important are considered to be the socket of the microprocessor, the chipset, the basic input output type of system and the real time clock type of chip. Each of these features has their own important role in influencing the performance of the computer. The socket which is specific for the microprocessor determines the type of central processing unit to be used within the motherboard. The chipset is also very important and it consists of two main parts: the northbridge part and the southbridge one. The basic input output system (BIOS) is also very important for the computer because it deals with controlling its most important functions. These components are all very important and they have to function properly in order to support the computer system to operate properly.

The motherboard is also a very important part of computer hardware because it includes important types of slots and ports for the computer. These are the peripheral type of component interconnect, the accelerated type of graphics port, the integrated drive electronics, the important memory slots and the universal type of serial bus. These are not the only components included within a motherboard. Nowadays, the modern motherboards are also able to support other types of more technologically advanced components and features such as the RAID, which stands for redundant array of independent discs, the PCI Express and on board sound features. These are the newest types of features which can be said to also represent the latest technology in motherboards.


The central processing unit is another vital part of computer hardware especially in what concerns the speed and the performance of the computer. It influences very much the way in which the computer functions. In the case in which the central processing unit is a good one it will improve the functions of the computer hardware. In the other case, the performance of the computer will be badly affected and the speed of the computer will be diminished as well. In the past, all central processing units included the same set of pins used to connect them to the motherboard in order to make it possible for the computer to operate. In this way, it was the case that any type of processor was suitable for any motherboard included within any computer. Nowadays, this is not the case. Central processing units are being connected to motherboards with different types of pins, and this means that it is no longer possible to use any type of processor within any type of motherboard. There are many types of sockets included within computers nowadays as well. Some examples would be the Socket 478, the Socket A, the Socket AM2 and many other types. They are different and specially made to be appropriate for certain types of processors included within computers.

Nowadays, everyone is interested in finding as much information as possible about the latest technology in computers. It is also very important to be aware of the necessity for us first of all to have the basic knowledge about computers and the parts of computer hardware in order to be able to work with the components presented as parts of the latest technology.

We need to firstly understand how they work in order to actually be able to use them within our computers properly. Also, this knowledge will help us overcome certain problems that we might encounter while working with our computers.


If you liked this post, SUBSCIBE to our blog by filling your e-mail address below:

Read more...

A New All-In-One Desktop PC From HP


HP is back by bringing you their latest all-in-one desktop PC. Dubbed as the All-In-One 200, this space-saving machine comes equipped with a 21.5-inch 1920 x 1080 Full HD display, a 2.7GHz Intel Pentium dual-core processor, an Intel GMA X4500 HD graphics card, a 4GB RAM, a 500GB hard drive, a built-in webcam, a SuperMulti DVD burner, a 6-in-1 memory card reader, WiFi and runs on Windows 7 OS. The HP All-In-One 200 retails for $699.99. [HP]

Read more...

T Power USB Stick Improves Your Health


The T Power USB stick from KJ Global UK promises to help blood circulation and reduce eyestrain, while you are working in the front of your computer. This gadget generally improves your health and vitality through some unknown mechanism. If you are interested, you can purchase the T Power USB Stick for £39.95 a pop. [RedFerret]

Read more...

DosPara Ships Prime Galleria XF 3D Vision Desktop PC


DosPara has begun shipping their first 3D desktop PC in Japan, the Prime Galleria XF 3D Vision. The system comes bundled with an Acer GD245HQbid Full HD monitor and a NVIDIA GeForce GTX285 1GB graphics card, which does not need additional parts to play in 3D. Specs-wise, the machine offers a 2.80GHz Intel Core i7-860 CPU, an Intel P55 Express chipset, a 4GB RAM (up to 16GB), a 1TB hard drive, a 160GB SSD (optional), a DVD Super Multi and runs on Windows 7 Home Premium OS. The Prime Galleria XF 3D Vision sells for a starting price of 186,800 Yen (about $2,000). [DosPara]

Read more...

HP Designjet 3D Printer


Hewlett-Packard has rolled out the powerful 3D printer that “turns three-dimensional CAD drawings into tangible prototypes by extruding partially molten ABS plastic in extremely fine layers one atop the other, forming the entire 3-D model in a single piece from the ground up.” However, this amazing technology is not cheap. You should spend a hefty €13,000 (approx. $17,500) to bring home the HP Designjet 3D printer. What’s more, this 3D printer can only print using ivory-colored plastic. The HP Designjet 3D printer will be available in May 2010 in Europe. [technabob]

Read more...

Setup and Configuration HOW-TO


Installing the DOS partition

Since you will NOT be installing DOS to the entire hard disk, but to just a small portion of it, you will need to be careful to not let the automatic setup program for DOS configure your hard drive partition for you, as it will want to fill the drive with DOS and you'll not have any room left for Linux.


When you first boot into the DOS setup program you will want to hit F3 twice to exit the setup and get to the A: prompt.

When pondering how much space to leave for DOS, remember that a very pared down Slackware Linux will require about 700meg (500meg for the root partition, 100meg for a swap partition, and 100meg for a /jnos partition).


From the A prompt you will want to use FDISK to access the hard disk and first view the present partitions on the drive. Do NOT just delete all the partitions on the drive first-- as that can be counterproductive depending on what's on that drive.
When you are viewing the partition table, if the whole drive is just one giant DOS partition then yes, you should delete that whole partition.

On the other hand, many Compaq owners, some Dell and IBM owners (and other manufacturers) will have what are called 'maintenance' partitions on the drive. These 'maintenance' partitions are NON-DOS partitions and usually relatively small. You will want to keep any of these small NON-DOS partitions so that your machine BIOS configuration and maintenance functionality can be maintained.

If your machine is already setup with a small DOS partition and a larger secondary partition you might want to leave the smaller DOS partition in place and delete the secondary partition-- this will save you from having to install DOS (though, installing DOS is not a big deal).

Jnos for DOS does not require much room, 100meg should do most hamgates quite well.

I made a 500meg DOS partition (of the 5gig hard drive) in the machine used in writing these pages. 500meg is plenty more than the DOS Jnos would ever need and perhaps a bit of overkill.

Please also be aware that the DOS partition will also be available for use while you are running Linux, so the space set aside for DOS is not lost when you are not running DOS.


After you are done with the DOS Fdisk partition table tool you can reboot into the DOS installation floppy and let it do it's automatic install of DOS, as it would now just be putting DOS into that smaller partition on your hard drive.

I'll get into installing Jnos on DOS after I complete the pages on installing Jnos on Linux-- so you will have to wade through all the Linux work first.

Yea-- I'm mean and heartless. Waaaaa!

Read more...

Slackware-Linux Installation A


Installing Linux Slackware 10.1

OK... Now it's time to put that first Slackware 10.1 CDrom into the CD drive and power up the computer--- cross your fingers as you do this.The Slackware ISO CD#1 is a bootable Linux CD and if your CD player knows how to deal with bootable CD's (and the BIOS of your machine is set to boot from CD-- check that if there's trouble) you should see lots of action on the screen when the machine boots up.When this 'action' stops, you will see at the bottom left of the screen the prompt 'boot:'


When you get the 'boot:' prompt, hit the ENTER

key. You'll see lots of text fly by on the screen-- read every word if you can, but don't feel bad if you can't remember much of it.Hit ENTER again when you get asked to select a keyboard map.

You will be shown an 'IMPORTANT' message... as it will warn you of some of what will be going on shortly.When it tells you to login as root with the 'Slakware Login' prompt, type 'root' and then hit ENTER.

If it says 'Linux 2.4.29...' then you're logged in.

At this point, you need to setup the Linux partitions on the hard drive.

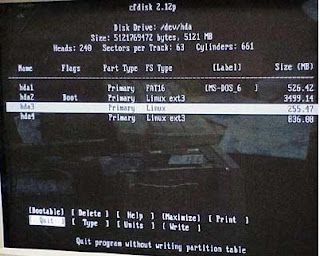
Type 'cfdisk' to start the Linux version of Fdisk.

You will see at the top of the screen your present DOS 'FAT16' (or FAT32) partition-- you want to keep the DOS-FAT partition!

While it is highlighted, you want to use the right and left arrows to highlight 'bootable' on the bottom of the screen and hit ENTER to toggle the 'bootable' flag to OFF (no bootable showing) for that DOS

partition.

Please remember that the linux root partition (usually 'hda2') will need at least 500meg for a pared-down bare bones Slackware Linux.

Add to this that you'll want to add a 100meg or more swap partition and a 100meg or more /jnos partition.

Now you want to use the down arrow to 'free space' and then use the right arrow to select 'NEW'. Hit Enter.

We are now configuring what Linux calls /dev/hda2 -- this will be the partition that the main Linux operating system will reside on. It's also known as the 'root partition'. When it asks you how large to make this partition, you want to make it fairly large-- so you can load lots of Linux programs and features. On my 5meg drive, I chose 3.5meg for this partition.

I would recommend you choose at least that size too, as it is assumed your /dev/hda2 (or '/' or 'root') partition is at least 3.5meg in these instructions-- you'll see why later on.

Before we leave the /dev/hda2 partition, you will want to use the right/left arrows to highlight 'bootable' and then hit ENTER to make that partition bootable.


Next we hit the down arrow again and highlight 'free space' and then right arrow over to NEW. We will now create the 'SWAP' partition. This is where the Linux version of the Windows 'swap file' goes.
In my case, I selected a swap partition of 255meg. While our new /dev/hda3 'swap' partition is highlighted, we want to use the right arrow and move it over to TYPE and hit ENTER.
Now we see a screen which lists all the different types of partitions you can make with this great linux cfdisk tool. As you can see, you have quite a selection.


Hit the spacebar to get to the second page.

Notice that under the list it says 'TYPE: 82'. This is what we want. Type 82 is a Linux swapfile type. If it doesn't say 82, make it say 82. Hit ENTER once the TYPE is 82.


Finally, we hit the down arrow again into free space and then right arrow over to NEW and create our final jnos partition.

Use up all the remaining space of the hard drive with this new /dev/hda4 partition. As long as you have 100meg or more your Jnos will be happy.

I suggest putting Jnos on it's own partition as this will allow you to have fun upgrading Linux later on and not have to worry too much about erasing your Jnos files. It's very handy to keep it separate.

When you have no free space left on the drive, you MUST right arrow over to the WRITE command in order to write the new partition table to the hard drive. Follow the prompts and type in 'yes' when it asks you to.

Before you quit out of CFDISK, make sure you have written down what the names of the various partitions are and what they will be used for. hda1=dos, hda2=linux root, hda3=swap, hda4=jnos. Failure to write this down will cause you considerable misery very soon.

When it's done writing to the partition table, use the right or left arrows to highlight QUIT and then hit ENTER to get back to the Linux setup screen.

Read more...

Slackware Installation B


Slackware Installation B

Now that you've created the partitions needed on the hard disk it's finally time to actually install Slackware Linux onto your machine.

From the linux prompt (root@slackware) type SETUP and you will be greeted by the spartan blue 'somewhat graphical' screen of the slackware setup program.

Hit the down arrow button and select the ADDSWAP option and then hit ENTER.

When we created the linux 'swap' partition earlier with CFDISK it was created as 'hda3' on the drive. Linux will address that partition as '/dev/hda3' . (please ignore the /dev/hda4 in the image to the right as it was taken during a different Linux installation).


We need to tell the setup program that this is what we want. Setup will generally find our swap partition and present the proper information, hit ENTER if what is presented on the blue screen is appropriate. (it should be!) It will automatically format
the swap partition for you.
When you get to the screen 'swap space configured', hit ENTER to continue.

You will now be given the opportunity to tell SETUP which partition to use for the main Linux installation (often called 'root') partition. The root partition is denoted as '/' and is where the main operating system (Linux) files will be put.

In CFDISK we created this root partition as 'hda2' and we will want the SETUP program to identify it as /dev/hda2.Make sure the /dev/hda2 is highlighted and then hit ENTER.


You will be prompted if you wish to format the new partition. Since most of us are in a rush, the quick format is OK.

If you suspect your hard drive is flaky and are too stubborn to toss it in the dumpster (where bad hard drives belong) then select the full check. Either way, you DO want to format this partition.


You can now select what type of filesystem you wish to use. Either ext2 or ext3 will work. I've been using ext3 for no really good reason.


Now-- on the next screen you're shown some really hi-tech stuff. Block size and inodes. For the linux partition ('root' or /) where the linux system files are kept, we are best to use the default. We will NOT use the default for the Jnos partition-- as most of what Jnos puts on the hard drive are very small text files.

So, since this is the root linux partition, leave the default 4096 highlighted and hit ENTER. Slackware setup will now format the root linux partition.


When the root partition format is done we will be given the screen to 'Select other linux partitions'.

On this page we hit the down arrow if needed and highlight the /dev/hda4 partition-- that's where /jnos will be. Hit ENTER when it's highlighted.

As before, a quick format is fine, and select ext3 for the filesystem type.


This time around, when we get to the block size/inode page, we will select the 1024 setting. One 'inode' per 1024 bytes. This will allow your hard drive to be more fully packed with jnos text files.


When it has finished formatting, it will ask you for a 'mount point'. You want to enter '/jnos' in the box and hit ENTER.


When you're done adding the SWAP, ROOT, and JNOS partitions you should see this screen showing that it will be adding them to the /etc/fstab file. This '/etc/fstab' file is where Linux looks to see what drives (hard drives, cdrom, floppy) are connected to the system.
Slackware setup will now display a screen saying that a FAT partition has been detected. Oh my God-- Where's Richard Simmons when you need him!

YES you do want to add the FAT partition to your fstab file. This makes that DOS partition (known as FAT in linux-speak) available to you from within Linux (which is rather handy). Make sure YES is highlighted and hit ENTER.

Make sure the FAT DOS partition of /dev/hda1 is highlithed and hit ENTER.

You can now pick a mount point for the DOS directories. I have been choosing '/dos' or '/fat-dos' as my selections. One drawback to just calling it '/dos' is that it might bet confusing for you at some point-- you might forget you're in Linux, so /fat-dos might be better.

ou will next be greeted by a screen that will allow you to select where the 'source media' is for your Slackware-Linux installation.Since we're installing off a CD-ROM, select the SLACKWARE CD and let it automatically scan for the CD.In most cases it should find the CDrom at/dev/hdc.


If SETUP does not find your CDrom drive, then you have a major problem. Time to get out the sledgehammer and correct it. If you don't have a sledge, a 9mm piece of lead (jacketed in copper or not) through the CDrom drive should fix things good.

Read more...

MY Banner

Lorem Ipsum

Submit your website to 20 Search Engines - FREE with ineedhits!
Submit Your Site To The Web's Top 50 Search Engines for Free!

  © Blogger template On The Road by Ourblogtemplates.com 2009

Back to TOP